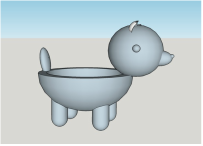
 | This is the Doge planter I made. I don't know what I did. it was not fun. I wanted to cry. I am not printing it because it wasn't working |
|
0 Comments
Review Chunk #1
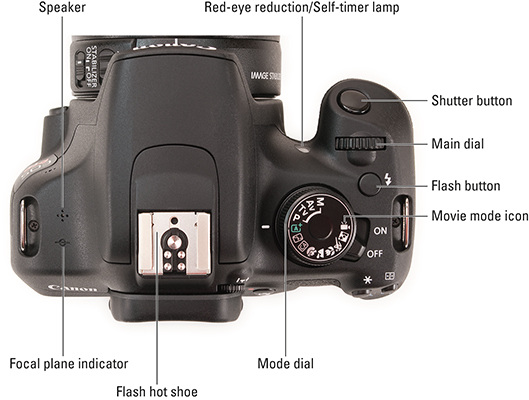
Review Chunk #2View Finder is the small square window that has an accurate lens view View Screen large digital window with a digitally created image Manual Mode is when you have personal control of every setting to make the appropriate image. Automatic Mode sometimes works for an image, the camera is trying it's best to do the work for you and get the best settings for your picture. Black and White setting or monochromatic mode creates a gray scale (black and white) image Lens- This is the very expensive thing on the end of a camera. This can be focused, zoomed in or out, and adjusted to take a picture. This is also the first place that light enters. Iris acts like the human eye and is the mechanism that opens and closes within the camera lens. DSLR- Digital single-lens reflex. These cameras create a better quality image because they have a better response when taking an image. SLR- Single lens reflex. With an SLR camera you can see exactly what the lens sees, these can be used for action photography. They have large image sensors that produce high-quality photos Mirrorless camera In a DSLR camera the mirror is placed in the back, but without a mirror the camera becomes much more compact. Macro Photography focuses on an and can make a blurry effect in the background. Small stuff is up close with a shallow depth of field. 12 to 7 inch range. Landscape Photography shows space within the world, this can be seen as vast or microscopic. To successfully take a landscape image, you have to use an appropriate edge. If you want to capture a wide view use a wide lens. Higher resolution and larger format digital cameras permit a greater amount of detail and a wide range of expression. But, the larger format yields a smaller depth of field to create the details and textures within the image. Wide Angle lens: pro: great for taking the landscape photos as said previous. Cons: can change the depth of field causing a loss of detail. 50mm Lens due to it's size is better to travel with. The lens has a high value at a low cost. Also it is light weight and versatile. Built in flash (pop up flash)- Built in flash is an attachment to add to the camera. Also, the flash helps take portraits. Hot shoe- This is positioned at the top of the camera to add on compatible accessories including a pop up flash. Off camera Flash is a flash (light) that is synchronized with the camera. Noise- any form of visual distortion Overexposed image is an image where the white balance looks way to high. Underexposed image is an image that looks to dark and may have some noise as well Review #3 View tools: Zoom- This allows you to zoom in and out on an image to look at specific details and composition. Hand tool- This grabs an image to view another area Layers:Delete- To delete a layer you can right click and then delete.Merge- (down, flatten, visible): Makes the layers go together to make one solid image. When you flatten the layers all of the layers become a background layer. A visible layer is the eyeball next to the layer selection list. If when an image is almost complete and one layer just doesn't work you can make the layer visible or invisible accordingly. Down makes all of layers go on to one layer and still be adjustable. Duplicate- To make the same layer more often or repeat the image of one layer again to make changes that can be removed. "Blending mode of layer"- By using layer blending modes you can determine how a layer blends with the other layers. This can be done using the blending mode menu. Layer visibility- Layers becomes visible or invisible using the eyeball on the side of the layer tab. Opacity- this is how translucent or opaque a layer is. Difference between background layer and layer 1- A background layer is not adjustable while layer one is. Move Tool: Function- This moves an image or pieces of an image around. Select- You can select specific pieces of an image and then move it. Selections tools: Lasso- This selects upon movement allowing some freehand shapes to be selected and moved. Magnetic lasso- This does the same thing as the lasso, but it sets up this sort of anchor for selection making it less freehand. Polygonal lasso- This allows you to select specific shapes of an image that you freehandedly created. Rectangular marquee- This is a bow selection tool that can move white and black lines. Magic wand- This tools does the best it can to select a specific color or area. You can adjust the tolerance to increase the specificity of the tool. This tool finds sections of an image that are all similar in color tones. Quick selection- This quickly selects an area similar to the magnetic lasso tool. Selection brush- The selection brush tool can paint over the area that you want to select in selection mode, or paint over areas that you don't want to select using the semi opaque overlay in Mask mode. (See above picture). Add to selection- This tool looks like a square with three darker gray corners (See above picture). Subtract from selection- This tool looks like two squares one on top is darker than the other square on the bottom (See above picture). Touch up tools: Spot healing brush- It takes the pixels within a selection and fixes them, or blends them to make it look less like a spot. Healing brush- This healing brush is similar to the spot healing brush except the selection range is larger. Clone stamp- This is a stamp shape button. Alt click on an image go to a new layer and click to recreate the exact image. Blur tool- The blur tool blurs an image. This could be used to blur a figure that has been placed into an image into the background. Sharpen tool- This sharpens the contrasting textures of an image. Smudge Tool- This smudges the pixels of an image. Contrast tools: Dodge- The dodge tool lightens an image based on selection. It is like it takes the colors of a selection and adds white to them. Burn- This darkens the pixels of an image. It is like it takes the colors within a selection and adds black. Drawing Tools: Paint brush and brush preset picker- This paint varying shapes, sizes, and textures on to an image. Photoshop supplies you with a set of brushes, but you can add more. These brushes can be applied for painting, drawing, erasing, burn, dodge, and many other tools. Color replacement tool (hue/saturation/color)- This can be found under the paintbrush. The arrow with the square represents the color swatch of paint. Eraser- The eraser specifically erases what has been drawn. Paint bucket- The paint bucket fills in an entire image or shape with one color. Gradient Tool- The gradient tool can blend multiple colors together and add a gradient to them. Also, you can make your own gradient besides the preset ones. Text tool- The text tool allows you to add text to your image in varying degrees of size, color, and font. Pencil Tool- The pencil tool default is one pixel. Color picker- The color picker is near the color swatch this can allow you to pick a specific color. Photo physical adjustment tools: Crop tool- The crop tool, crops or cuts an image to any shape that you want so long as it has ninety degree angles. Navigation tools Photo bin- This is the column at the bottom of the Photoshop page that shows how many photos you have open. This helps put objects within an image onto another image. Effects- This is the width and height of a piece. Review #4 Image: Rotate: (what's the difference between rotate 90 degrees left and rotate layer 90 degrees left?): When you rotate 90 degrees left the image moves but when you rotate a layer 90 degrees everything on that layer moves. Transform: This allows you to shew or warp objects within an image. Ultimately transforming the perspective of that image. Free transform: This does all of the same things that transform does, but things can be done in a faster process. Skew: When an image is skewed one side of the image is made smaller than the other side. Distort: To distort an image you use a drop down menu and pick distort this allows you to change the image perspective. Perspective: The perspective of an image is how it is distorted mixed with the opacity and translucence of the image. Resize: To resize an image it changes the scale of an image. Image size: The image size is how large of an image you are using or working with, within Photoshop. Generally these are images found on google. Canvas Size: The canvas is generally blank or can be filled in with a color. But the canvas size allows you to apply images or textures to a piece on one size framework hence the canvas. Enhance Adjust Lighting: To adjust the lighting you can brighten or darken an image. Shadow/Highlights: This changes the color, tone, brightness, or darkness of the shadows and highlights. This can also adjust how present the highlight and how present the shadows are. Brightness/Contrast: The adjusts the contrast between color variations or shades within a piece. Also, this can change the way that the brightness of an image is viewed. Meaning that an image can be made brighter or darker based on how bright you want the image to be. Levels: This changes the image by adjusting the color levels. Adjust Color: When adjusting the color you can change how the color looks overall within an image. Adjust hue/Saturation: By adjusting the hue and saturation you can change the color tones within an image. This allows the image to look more saturated and can change the hue to a blue/ green or a yellow/ red hue. Remove color: By removing the color the image will turn black and white. Adjust color curves: When adjusting the color curves you can adjust how extreme the color looks. Color Variations: color variations allows the color to be variated by hue, saturation, and brightness. Filter Adjustments: By choosing the filter from the filter menu the image can be distorted or changed according to the filter. Invert: By inverting the image it is turned upside down. threshold. Filter gallery (same functions as effects short cut): the filter gallery allows you to pick a filter faster with a click and go menu. Blur: this tool allows you to blur the color of a certain section within an image. It can be used similar to a brush. Distort: Liquify: This adds a watery affect to the image. You can make your eyes larger, push and pull things within an image. Noise: you can add noise to an image. This makes the image look more grainy or blury. Review #5 Left Sidebar Pointer: this tool allows you to move, select, copy, rotate, shear, or resize objects. Node: allows you to select to edit, move or delete. Pencil: Drawing freehand lines. Brush: painting freehand lines and curves with a specific brush. Pen: can draw a smart curve or a bezier. Connector: connect two objects with a variety if connectors. Free form Paint: create or add selections to create shapes. Erase: allows you to erase based on selection or entire objects. Knife: The knife tool cute the shape along the preferred line. Flood: applies and presets fills. Quick [shape]: can create an adjustable shape. Artistic Text: This adds text to an image and can bend, change size, color, and angle of the words. Color Picker: This is a selection tool used to pick a specific color. Fill: This is a paint bucket that will fill in any shape. Mesh Fill: This will fill in any shape with color, but only in a certain pattern. Shadow Tool: This will add any amount of depth to a shape. Crop: This will adjust the size of an image. Perspective: This will allow you to see certain shapes and or how things are layered over each other. Instant 3d: This will instantly make any shape have a 3D effect. Shape Builder: This will allow you to make a shape, but is limited to a few shape selections. Top choice Decrease Contrast: This will lower the contrast between the colors within an image. Increase Contrast: This will raise the contrast between the color within an image. Decrease brightness: This will lower the brightness or the amount of white in the images. Increase Brightness: This will add white to the image. Auto Contrast: This will auto adjust the image to create a specific contrast. Photolab: This will allow you to cut out specific part of an image and add it to others. Cutout Studio: This cuts out a specific portion of the image. Auto Trace: This traces an object within an image. Right sidebar Top box Color: This will add color to any portion of an image. Opacity: This will make an image or layer based on selection more opaque (solid) or transparent based on selection. Blend Mode: This will blend colors together within a shape. Swatch: This allows you to pick a specific color within the swatches. Transparency: This based on selection allows you to make something more see through. Line: This allows you to draw a line on the image. Middle box Styles: this allows you to pick different styles of textures for an image. Brushes: This is a selection that you can pick from to create certain effects within an image. Layers: This is made every time you make a new shape. Gallery: This allows you to put multiple images together. Add a layer: To add a layer use the layer button and then hit add layer. Delete layer: To delete a layer use the layer button and then hit delete layer. Merge layer: This will squish all of the layers together, creating one layer. Third Box Arrange: This allows you to arrange the composition and the layers of a piece. Transform: This allows you to totally change an image with a selection of an effect. Align: This allows you to square up an image to other things and align objects within the piece. Review #6 4 Main Classical Portrait Lighting Techniques Loop: This creates a loop of shadow on the jaw and the nose, but only on one side of the face giving a loopy look. Butterfly: This creates a shadow of the nose on the top that creates a butterfly effect. Rembrandt: This creates a triangle of light on the cheek of the face. Split: This creates a shadow on one side of the face. It is very similar to side lighting. Broad vs.Short Lighting Broad: This is taking an image on the lighter side of the face Short: This is taking an image on the darker or shadowed side of the face. Soft Box: This is a light that creates a soft illumination on the subject, generally a white light. Reflector disks and Umbrellas: These direct the light in different directions changing the lighting. Key Light: This is the use of one light. Fill Light: This light will fill in the dark areas of an image. Hard vs. Soft (Diffuse) Light Hard: this light is very close to the face or subject creating harsh shadows. Soft: this light is very diffuse on the subject of an image. Side lighting: This lights a subject from the side. Back Lighting: This lights a subject from behind. Rim Lighting: This lighting is used directly behind a subject creating a rim of light around the subject. Ambient Lighting: This is natural lighting. Spot Light: This lights up a subject in only on spot. Artificial Light vs. Natural Light Artificial: this is light created based on using lamps and bulbs. Natural: This is ambient light that is naturally found. Combination Lighting: This is the use of multip0le different kinds of lights. This could be a yellow bulb used in combination with a soft box. Monolight: This is the use of one light. Cool vs. Warm Lighting Cool: this is a white or blue light. Warm: this is a use of an orange or yellowish light. Tungsten vs. Fluorescent Tungsten: this light is orangish. Fluorescent: this light is very white. Review#7 The way an image is arranged. Know them and how to identify them.
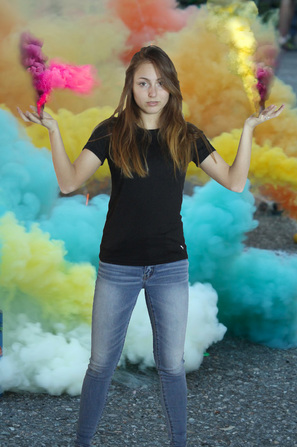
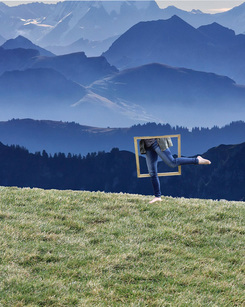
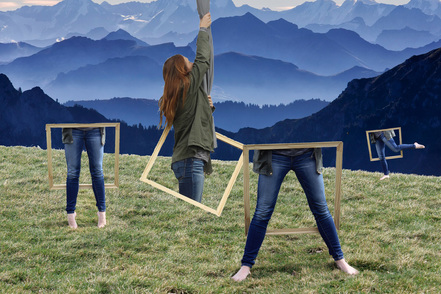
Composition and Balance of the image Radial: circular. Symmetrical: same on each side. Asymmetrical: heavy on one side Visual Descriptions and qualities of an artwork Texture: This is the way that an image works. If a subject is wearing pants the pants should have a realistic texture. Contrast: This is the difference between colors within an image. Perspective: This is how an image is composed an viewed. Emphasis: This is used to create an image. This can be seen when some things are closer and some things are farther away. Unity: This is when things within an image look similar. Pattern: This is a repetition within a piece. Color: This is used within an image to create depth an value. Hue: This is the color tones used within an image. Value: This is how dark or light an object within an image is. Gradation: This is how a color changes within a shape for value. Saturation: This is how similar the color is within an image. Color Theory. Know the different types of grouped color theories. Analogous: These colors are all related to each other. Complementary: These colors are across from each other on the color wheel. Monochromatic: same color within an image. Changes in color based on the addition of white and black. Tetrad: these colors form a triangle on the color wheel. Triad: these colors form a rectangle on the color wheel. Split Complementary: by using the split compliment, Colors are used within the compliments and form triangles on the color wheel. Art movement and style of Art Surrealism: bizarre This project was pretty easy except Chris was struggling and Abi is not a high jumper. I thought it was fun though.
After
1. Vector tools move whole images and automatically adjusts the smoothness of lines. 2. Artists prefer serif draw and vector tools because it is easier to create shapes than on Photoshop. 3. Serif draw is a very good program. Would be better with a drawing tablet rather than a mouse. Each drawing is totally adjustable, every shape has its own selection. Vector art can be adjusted at any point in time. Can resize image and not lose quality. I would recommend this program, it gives you the ideas of vector programs and the concepts other programs are more in depth. Before
|